Hello NFT
31 Aug 2021Post Directory
Intro
緊接著上次的 Hello Smart Contract,Alchemy Doc 接下來的範例為 ERC 721
也就是今年紅起來的 NFT(Non-Fungible Token),貓咪、明星卡、藝術品、甚至是石頭 Ether Rock(下圖),都能成為 NFT

一樣為該文件的學習筆記,詳細範例可以參考: https://github.com/VagrantPi/hello-nft
而流程基本上一篇差不多,不過這次多使用到一個 contracts library - OpenZepplin
A library for secure smart contract development. Build on a solid foundation of community-vetted code.
因此我們可以更安全、簡單的建立合約
先安裝一下
npm install @openzeppelin/contracts@3.1.0-solc-0.7
🎨 新建合約
Source: 🎨 How to Create an NFT
接下來看到合約的部份
//Contract based on https://docs.openzeppelin.com/contracts/3.x/erc721
// SPDX-License-Identifier: MIT
pragma solidity ^0.7.3;

import "@openzeppelin/contracts/token/ERC721/ERC721.sol";
import "@openzeppelin/contracts/utils/Counters.sol";
import "@openzeppelin/contracts/access/Ownable.sol";


contract MyNFT is ERC721, Ownable {
    using Counters for Counters.Counter;
    Counters.Counter private _tokenIds;

    // 第一個參數為 NFT 名稱
    // 第二個參數為 NFT's metadata
    constructor() public ERC721("MyNFT", "NFT") {}

    // 第一個參數為接收者 address
    // 第二個參數為該 NFT metadata,名稱、圖片...等描述,下面會提到
    function mintNFT(address recipient, string memory tokenURI)
        public onlyOwner
        returns (uint256)
    {
        _tokenIds.increment();

        uint256 newItemId = _tokenIds.current();
        _mint(recipient, newItemId);
        _setTokenURI(newItemId, tokenURI);

        return newItemId;
    }
}
@openzeppelin/contracts/token/ERC721/ERC721.sol: 因為需要用到 ERC721,這邊直接 import 後直接可以繼承使用,畢竟 ERC spec 也已經定義好相關接口了,EIP-721: Non-Fungible Token Standard@openzeppelin/contracts/utils/Counters.sol: 這邊使用 Counters 來給予每一個 minted NFT 唯一 ID,並追蹤其發行量@openzeppelin/contracts/access/Ownable.sol: 設定 access control 使得只有 smart contract 的擁有者才有權力 mint NFT,如果遺除掉 onlyOwner 的設定,那任何人都能 mint NFT
所以該合約簡單來說就是建立一個叫做 MyNFT,Symbol 為 NFT 的 ERC721,可以透過 mintNFT 方法來鑄造(mint) NFT
deploy script
async function main() {
   // Grab the contract factory
   const MyNFT = await ethers.getContractFactory("MyNFT");

   // Start deployment, returning a promise that resolves to a contract object
   const myNFT = await MyNFT.deploy(); // Instance of the contract
   console.log("Contract deployed to address:", myNFT.address);
}

main()
  .then(() => process.exit(0))
  .catch(error => {
    console.error(error);
    process.exit(1);
  });
流程跟上一篇一樣,compile 後
npx hardhat compile
然後 deploy
npx hardhat run scripts/deploy.js --network ropsten
Contract deployed to address: 0xa1270bb0BFacb686cCbc3D89072bBD4d7743cA87
https://ropsten.etherscan.io/address/0xa1270bb0bfacb686ccbc3d89072bbd4d7743ca87
🪄鑄造 NFT
Source: 🪄How to Mint an NFT
呼叫合約的 mintNFT 來鑄造 NFT,呼叫方法可以參考上一篇文章,而這邊還需要傳入一個 tokenURI 參數,其內容為 NFT Metadata,按造 “ERC721 Metadata JSON Schema
{
    "title": "Asset Metadata",
    "type": "object",
    "properties": {
        "name": {
            "type": "string",
            "description": "Identifies the asset to which this NFT represents"
        },
        "description": {
            "type": "string",
            "description": "Describes the asset to which this NFT represents"
        },
        "image": {
            "type": "string",
            "description": "A URI pointing to a resource with mime type image/* representing the asset to which this NFT represents. Consider making any images at a width between 320 and 1080 pixels and aspect ratio between 1.91:1 and 4:5 inclusive."
        }
    }
}
至少須包含 name, description, image,我們會使用透過 Pinata 這個 IPFS(P2P 網路的去中心化檔案系統)先上傳圖片,然後在將該格式的 json 上傳至 IPFS
上傳圖片至 IPFS
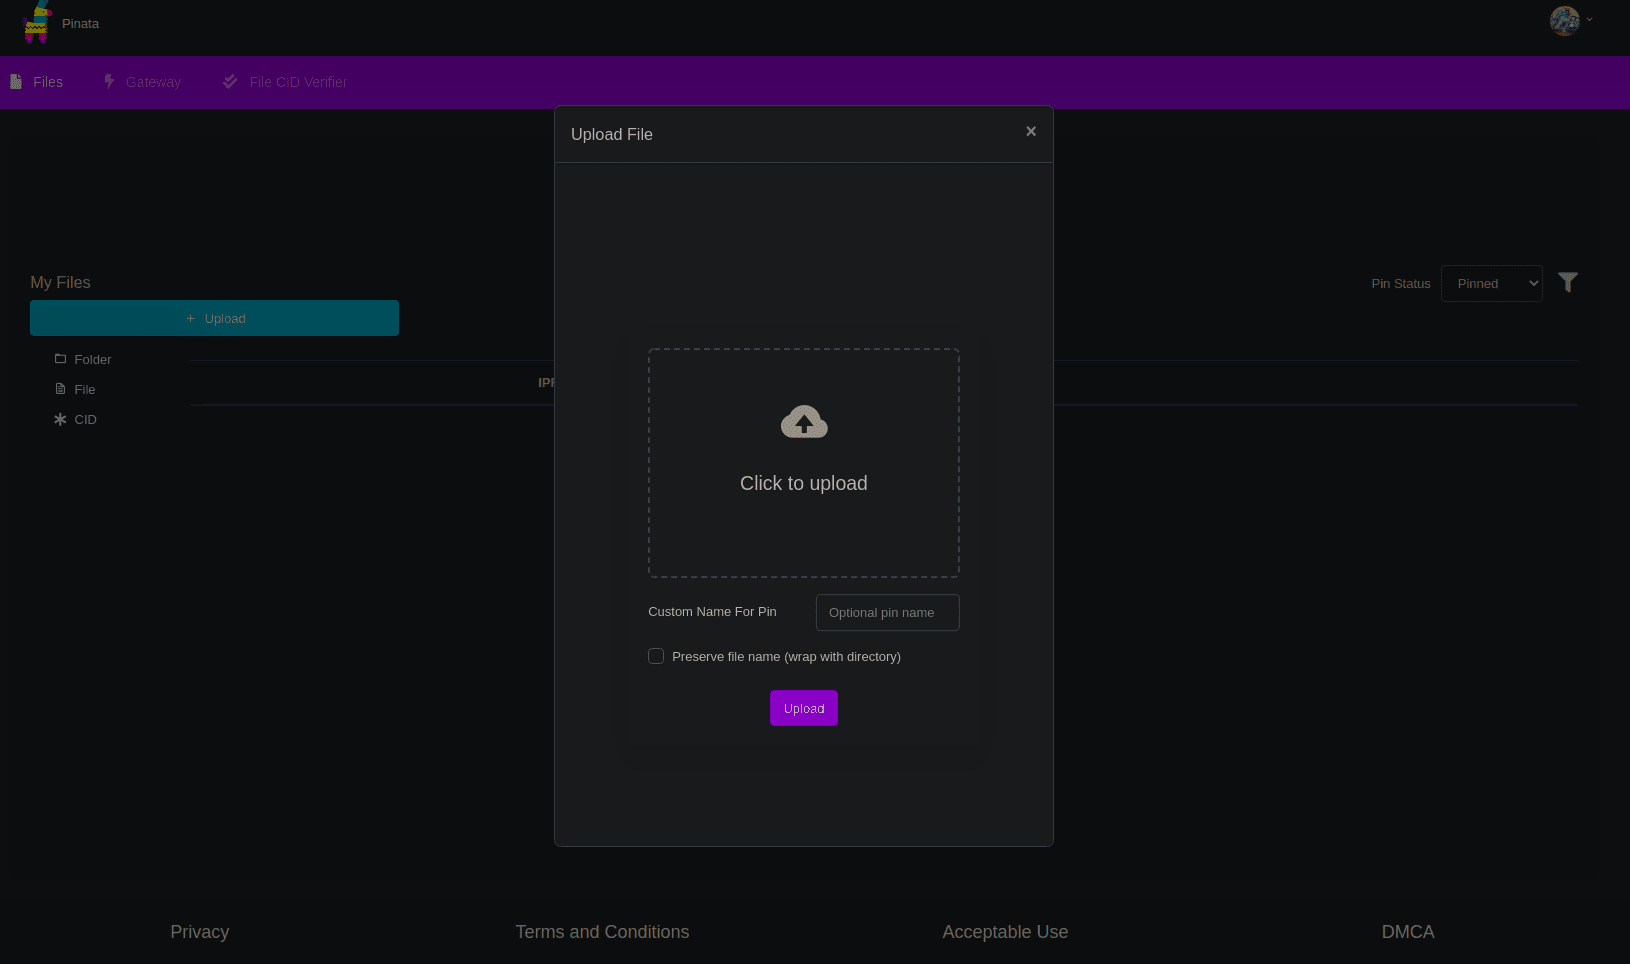
然後複製該圖片的 CID,該圖片的位置為 https://gateway.pinata.cloud/ipfs/<CID>

https://gateway.pinata.cloud/ipfs/QmYqfs79uSDJzdMebdA7z5BhMzggm4HzZHMGbxkhRZMEBW

存成 NFT Metadata 後再次上傳
{
  "attributes" : [ {
    "trait_type" : "Breed",
    "value" : "MeMe"
  }, {
    "trait_type" : "rank",
    "value" : "no. 1"
  } ],
  "description" : "the popular meme in 2021/08",
  "image" : "https://gateway.pinata.cloud/ipfs/QmYqfs79uSDJzdMebdA7z5BhMzggm4HzZHMGbxkhRZMEBW",
  "name" : "POPCAT data"
}
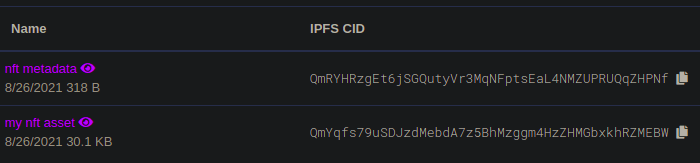
https://gateway.pinata.cloud/ipfs/QmRYHRzgEt6jSGQutyVr3MqNFptsEaL4NMZUPRUQqZHPNf
呼叫合約
// ...
const nftContract = new web3.eth.Contract(contract.abi, contractAddress);

async function mintNFT(tokenURI) {
  const nonce = await web3.eth.getTransactionCount(PUBLIC_KEY, 'latest');

  // the transaction
  const tx = {
    'from': PUBLIC_KEY,
    'to': contractAddress,
    'nonce': nonce,
    'gas': 500000,
    'maxPriorityFeePerGas': 1999999987,
    'data': nftContract.methods.mintNFT(PUBLIC_KEY, tokenURI).encodeABI()
  };

  const signPromise = web3.eth.accounts.signTransaction(tx, PRIVATE_KEY);
  // ...
  });
}

mintNFT('https://gateway.pinata.cloud/ipfs/QmRYHRzgEt6jSGQutyVr3MqNFptsEaL4NMZUPRUQqZHPNf')
Mint NFT
node mint-nft.js
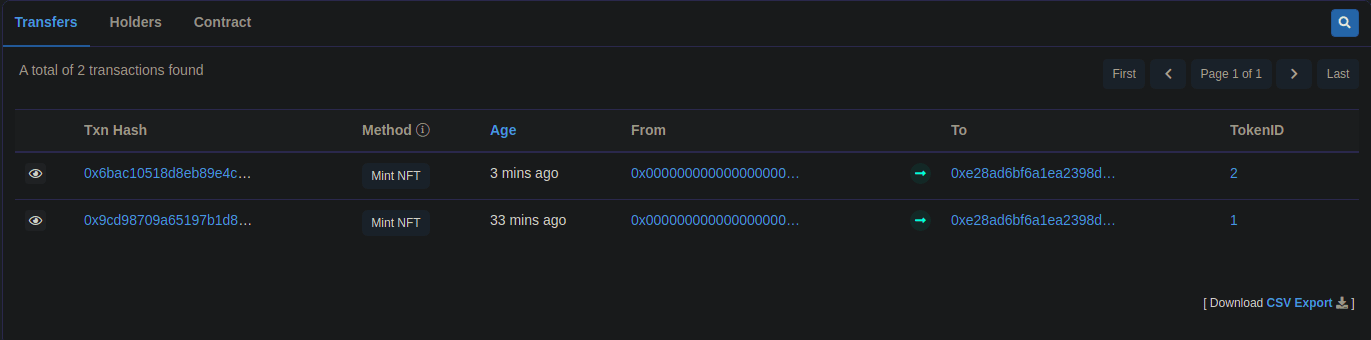
The hash of your transaction is:  0x6bac10518d8eb89e4c6ff535411b83316a6d52a6f529f9e2b2e75d60aab9b91f
Check Alchemy's Mempool to view the status of your transaction!
https://ropsten.etherscan.io/tx/0x6bac10518d8eb89e4c6ff535411b83316a6d52a6f529f9e2b2e75d60aab9b91f
此時看合約的頁面就可以看到
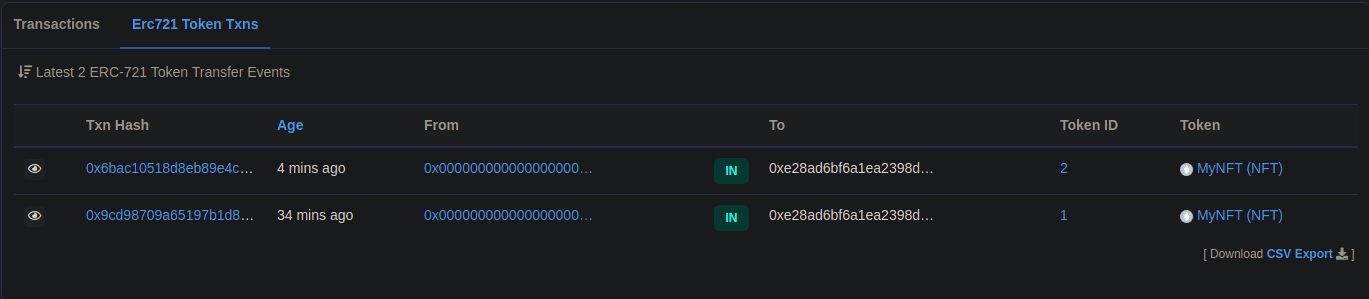
切到該錢包頁面也可以看到持有的 ERC721 新增了一個 MyNFT
使用手機版 Metamask 來查看 NFT
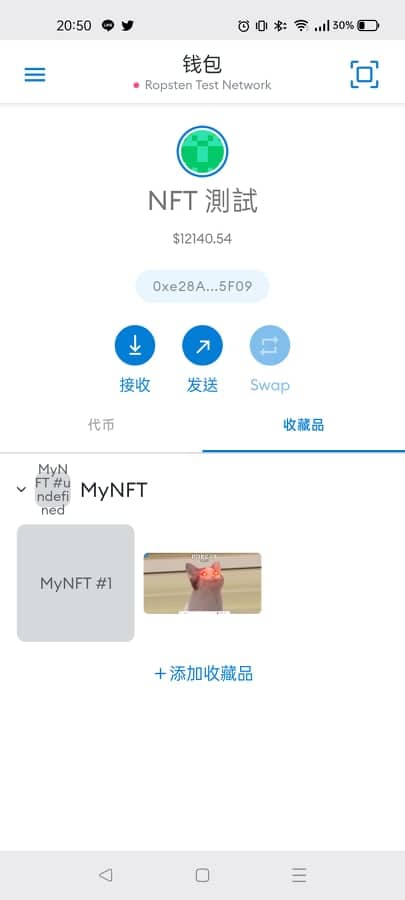
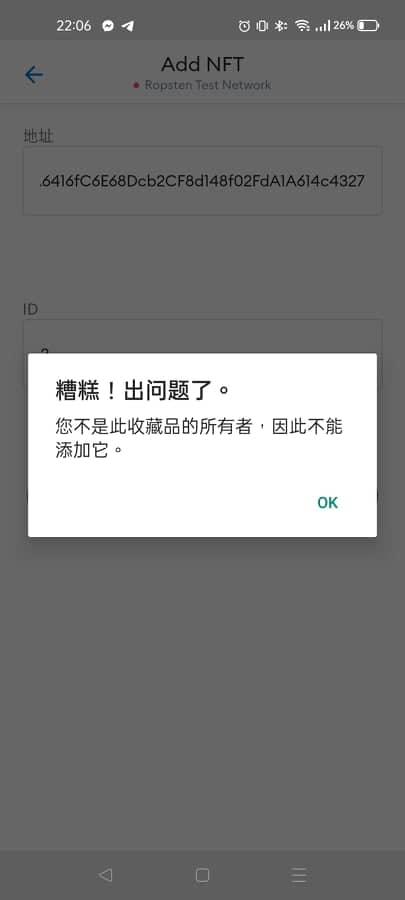
在收藏品那邊按下添加收藏品,然後將合約地址跟發行編號貼上就行
這邊的 MyNFT #1 當初在 mint 時直接貼上圖片網址。而不是後來上傳的 NFT Metadata JSON,所以顯示上就無法正確讀取
且如果填錯資訊也無法顯示
🪄使用 Ethers.js 來鑄造 NFT
這邊使用 Ethers.js 代替 Web3 的方式再做一次,並且使用到 hardhat-waffle 套件來測試合約,然後改用 TypeScript 來開發
安裝 TypeScript & hardhat-waffle
TypeScript
npm install --save-dev ts-node typescript
npm install --save-dev chai @types/node @types/mocha @types/chai
其他還有設定檔要副檔名,新增設定等,這邊請看連結,就不展開說明了
hardhat-waffle
為 HardHat 套件,用於智能合約測試
npm install --save-dev @nomiclabs/hardhat-waffle 'ethereum-waffle@^3.0.0' @nomiclabs/hardhat-ethers 'ethers@^5.0.0'
分別將用到的用到的功能封裝起來
mkdir lib
-
lib/contract.tsimport { Contract, ethers } from "ethers"; import { getContractAt } from "@nomiclabs/hardhat-ethers/internal/helpers"; import { HardhatRuntimeEnvironment } from "hardhat/types"; import { env } from "./env"; import { getProvider } from "./provider"; export function getContract( name: string, hre: HardhatRuntimeEnvironment ): Promise<Contract> { const WALLET = new ethers.Wallet(env("ETH_PRIVATE_KEY"), getProvider()); return getContractAt(hre, name, env("NFT_CONTRACT_ADDRESS"), WALLET); } -
lib/env.tsexport function env(key: string): string { const value = process.env[key]; if (value === undefined) { throw `${key} is undefined`; } return value; } -
lib/provider.ts這邊 provider 使用 ropsten(預設會是
mainnet),並設定好 Alchemy API Token,這邊也提共多種連線方案 supported alternativesimport { ethers } from "ethers"; export function getProvider(): ethers.providers.Provider { return ethers.getDefaultProvider("ropsten", { alchemy: process.env.ALCHEMY_API_KEY, }); } -
wallet.tsimport { ethers } from "ethers"; import { env } from "./env"; import { getProvider } from "./provider"; export function getWallet(): ethers.Wallet { return new ethers.Wallet(env("ETH_PRIVATE_KEY"), getProvider()); }
建立 Hardhat tasks
可以寫 Hardhat 的 task 來擴增 Hardhat 指令來完成一些自動化的操作
例如在該篇範例後實作的 deploy 跟 mint
AVAILABLE TASKS:

  deploy-contract    Deploy NFT contract
  mint-nft      Mint an NFT
並且可以通會 help 指令來查看說明
$ npx hardhat help deploy-contract

Hardhat version 2.6.1

Usage: hardhat [GLOBAL OPTIONS] deploy-contract

deploy-contract: Deploy NFT contract

For global options help run: hardhat help
在根目錄新增 tasks
import { task, types } from "hardhat/config";
import { Contract } from "ethers";
import { TransactionResponse } from "@ethersproject/abstract-provider";
import { env } from "../lib/env";
import { getContract } from "../lib/contract";
import { getWallet } from "../lib/wallet";

task("deploy-contract", "Deploy NFT contract").setAction(async (_, hre) => {
  return hre.ethers
    .getContractFactory("MyNFT", getWallet())
    .then((contractFactory) => contractFactory.deploy())
    .then((result) => {
      process.stdout.write(`Contract address: ${result.address}`);
    });
});

task("mint-nft", "Mint an NFT")
  .addParam("tokenUri", "Your ERC721 Token URI", undefined, types.string)
  .setAction(async (params, hre) => {
    return getContract("MyNFT", hre)
      .then((contract: Contract) => {
        return contract.mintNFT(env("ETH_PUBLIC_KEY"), params.tokenUri, {
          gasLimit: 500_000,
        });
      })
      .then((tr: TransactionResponse) => {
        process.stdout.write(`TX hash: ${tr.hash}`);
      });
  });
$ npx hardhat deploy-contract

Contract address: 0x6dA6416fC6E68Dcb2CF8d148f02FdA1A614c4327
https://ropsten.etherscan.io/address/0x6dA6416fC6E68Dcb2CF8d148f02FdA1A614c4327
$ npx hardhat mint-nft --token-uri https://gateway.pinata.cloud/ipfs/QmRYHRzgEt6jSGQutyVr3MqNFptsEaL4NMZUPRUQqZHPNf

TX hash: 0x38f64758b99b498372551d75fa09781408d40bd6f4daf842557580b95a929c34
https://ropsten.etherscan.io/tx/0x38f64758b99b498372551d75fa09781408d40bd6f4daf842557580b95a929c34
Testing
這裡多安裝了一些工具來幫忙測試
npm install --save-dev sinon-chai sinon chai
mkdir test
-
test/test-helpers.ts先將會用到的部屬合約跟錢包封裝起來
Note: 在測試完成後呼叫
sinon.restore();恢復,否則會造成 sinon 修改的值污染到下面的測試,因為 test-doubles 持續存在import sinon from "sinon"; import chai from "chai"; import sinonChai from "sinon-chai"; import { ethers as hardhatEthers, waffle } from "hardhat"; import { Contract, Wallet } from "ethers"; chai.use(sinonChai); afterEach(() => { sinon.restore(); }); export function deployTestContract(name: string): Promise<Contract> { return hardhatEthers .getContractFactory(name, getTestWallet()) .then((contractFactory) => contractFactory.deploy()); } export function getTestWallet(): Wallet { return waffle.provider.getWallets()[0]; } -
test/MyNFT.spec.ts將網路環境替換成 waffle,使合約可以跑在 Hardhat Network 上,該網路為 local 的,可以方便測試合約
sinon.stub(provider, "getProvider").returns(waffle.provider);import { ethers, waffle } from "hardhat"; import { Contract, Wallet } from "ethers"; import { expect } from "chai"; import { TransactionResponse } from "@ethersproject/abstract-provider"; import sinon from "sinon"; import { deployTestContract } from "./test-helper"; import * as provider from "../lib/provider"; describe("MyNFT", () => { const TOKEN_URI = "http://example.com/ip_records/42"; let deployedContract: Contract; let wallet: Wallet; beforeEach(async () => { sinon.stub(provider, "getProvider").returns(waffle.provider); [wallet] = waffle.provider.getWallets(); deployedContract = await deployTestContract("MyNFT"); }); async function mintNftDefault(): Promise<TransactionResponse> { return deployedContract.mintNFT(wallet.address, TOKEN_URI); } describe("mintNft", async () => { it("emits the Transfer event", async () => { await expect(mintNftDefault()) .to.emit(deployedContract, "Transfer") .withArgs(ethers.constants.AddressZero, wallet.address, "1"); }); it("returns the new item ID", async () => { await expect( await deployedContract.callStatic.mintNFT(wallet.address, TOKEN_URI) ).to.eq("1"); }); it("increments the item ID", async () => { const STARTING_NEW_ITEM_ID = "1"; const NEXT_NEW_ITEM_ID = "2"; await expect(mintNftDefault()) .to.emit(deployedContract, "Transfer") .withArgs( ethers.constants.AddressZero, wallet.address, STARTING_NEW_ITEM_ID ); await expect(mintNftDefault()) .to.emit(deployedContract, "Transfer") .withArgs( ethers.constants.AddressZero, wallet.address, NEXT_NEW_ITEM_ID ); }); it("cannot mint to address zero", async () => { const TX = deployedContract.mintNFT( ethers.constants.AddressZero, TOKEN_URI ); await expect(TX).to.be.revertedWith("ERC721: mint to the zero address"); }); }); describe("balanceOf", () => { it("gets the count of NFTs for this address", async () => { await expect(await deployedContract.balanceOf(wallet.address)).to.eq("0"); await mintNftDefault(); expect(await deployedContract.balanceOf(wallet.address)).to.eq("1"); }); }); }); -
test/tasks.spec.ts測試 Hardhat task
import { deployTestContract, getTestWallet } from "./test-helper";
import { waffle, run } from "hardhat";
import { expect } from "chai";
import sinon from "sinon";
import * as provider from "../lib/provider";

describe("tasks", () => {
  beforeEach(async () => {
    sinon.stub(provider, "getProvider").returns(waffle.provider);
    const wallet = getTestWallet();
    sinon.stub(process, "env").value({
      ETH_PUBLIC_KEY: wallet.address,
      ETH_PRIVATE_KEY: wallet.privateKey,
    });
  });

  describe("deploy-contract", () => {
    it("calls through and returns the transaction object", async () => {
      sinon.stub(process.stdout, "write");

      await run("deploy-contract");

      await expect(process.stdout.write).to.have.been.calledWith(
        "Contract address: 0x610178dA211FEF7D417bC0e6FeD39F05609AD788"
      );
    });
  });

  describe("mint-nft", () => {
    beforeEach(async () => {
      const deployedContract = await deployTestContract("MyNFT");
      process.env.NFT_CONTRACT_ADDRESS = deployedContract.address;
    });

    it("calls through and returns the transaction object", async () => {
      sinon.stub(process.stdout, "write");

      await run("mint-nft", { tokenUri: "https://example.com/record/4" });

      await expect(process.stdout.write).to.have.been.calledWith(
        "TX hash: 0xf9088be65ad2ef73aafda6dc24a2925fc2cc0c5c8372e7e47db0778e2984785a"
      );
    });
  });
});
$ npx hardhat test


  MyNFT
    mintNft
      ✓ emits the Transfer event (236ms)
      ✓ returns the new item ID
      ✓ increments the item ID (132ms)
      ✓ cannot mint to address zero (75ms)
    balanceOf
      ✓ gets the count of NFTs for this address (78ms)

  tasks
    deploy-contract
    mint-nft


  7 passing (4s)
結語
通過 OpenZepplin 可以很簡單就實作一個 ERC Spec 的合約,這邊也題到了合約測試的部份
而 https://github.com/VagrantPi/hello-nft 的 使用 Ethers.js 來鑄造 NFT 內容有些調整
比如 task test 中 mint-nft 後的 TX hash,這邊不確定是如何預先知道 TX hash 的,我跑測試出來的 Hash 會跟 How to Mint an NFT with Ethers.js - Step 4: Create tests 不同
還有在 tasks/nft.ts 中的 mint-nft
task("mint-nft", "Mint an NFT")
  .addParam("tokenUri", "Your ERC721 Token URI", undefined, types.string)
+  .setAction(async (params, hre) => {
-  .setAction(async (tokenUri, hre) => {
    return getContract("MyNFT", hre)
      .then((contract: Contract) => {
+        return contract.mintNFT(env("ETH_PUBLIC_KEY"), params.tokenUri, {
-        return contract.mintNFT(env("ETH_PUBLIC_KEY"), tokenUri, {
          gasLimit: 500_000,
        });
      })
      .then((tr: TransactionResponse) => {
        process.stdout.write(`TX hash: ${tr.hash}`);
      });
  });
不然會造成 tokenURI 是空的
