Drone - Re: 從零開始的 CI 生活
28 Sep 2018Post Directory
DevOps
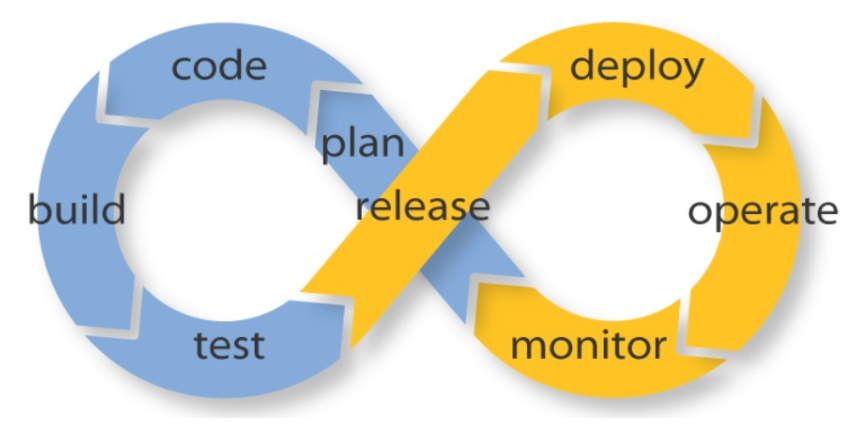
前幾年被炒紅的名詞,代表持續的測試與整合(左環跟右環),對懶惰的工程師來說,自動化是必須的,而隨著容器的時代到來,CI/CD 也多了個新選擇,也就是我們今天的主角
本次筆記快速過一次架起 Drone 並讓 Drone 自動幫你跑測試
Drone
drone - Drone is a Continuous Delivery platform built on Docker, written in Go https://drone.io
基於 Docker 上的 CI/CD,跟其他熱門的 Tool 比起來
優點
- 學習成本低
- 可加入版本控管
- 套件每種語言都能寫
- 支援常見程式碼管理平台
缺點
- 還很年輕(常改版?)
- 套件還不夠多
不過我也是剛踏進這塊,所以還不知道會遇到什麼其他問題
架構
由 1 台 Server 跟 1 台(以上)的 Agent 所組成,由 Server 透過 Webhook 跟 bitbucket 做溝通,然後才會分派給 Agent 跑
Drone 是基於 docker 上的 CI/CD,所以 Agent 上跑的測試或部署都是跑在 Docker 上,也很方便做到 scalable(開 Agent 很簡單)
Registration
學習成本低,這年頭 Docker 應該也是很多人都必點的技能了,外加一點寫 script 的經驗,基本上是無痛上手
即使不會 Docker 按照以下方法 step by step 應該也行
目前支援的程式碼管理平台有:
- GitHub
- GitLab
- Gitea
- Gogs
- Bitbucket Cloud
- Bitbucket Server
- Coding
這次以 bitbucket 為例:
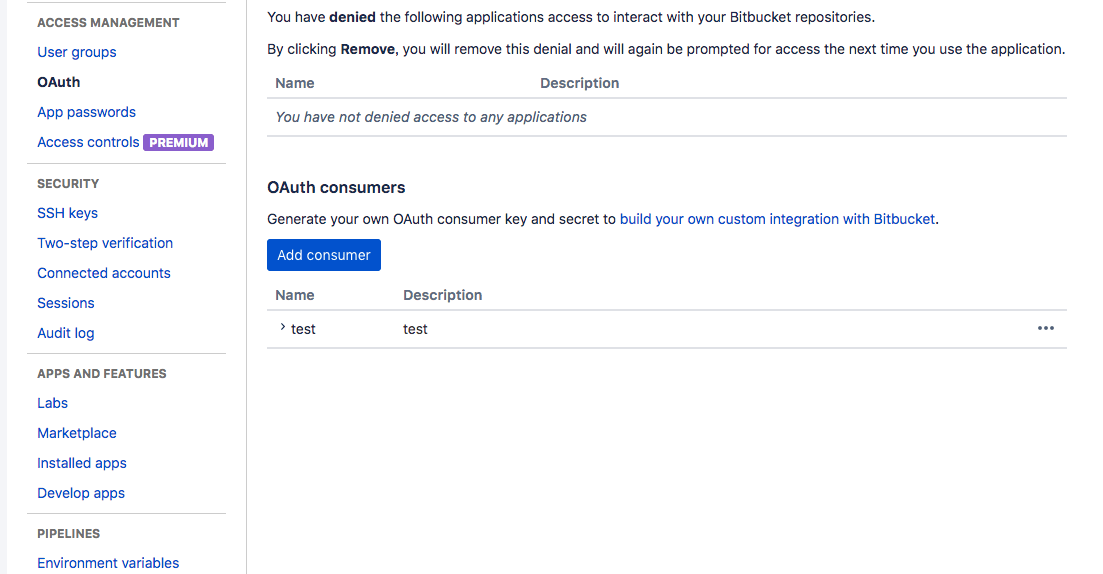
對於 Bitbucket 這類平台來說 drone 算是一種 application,而 drone 上的帳號也是透過 oauth2 方式連接這些第三方平台來登入的,所以需要先到 Bitbucket 上註冊
View profile > OAuth
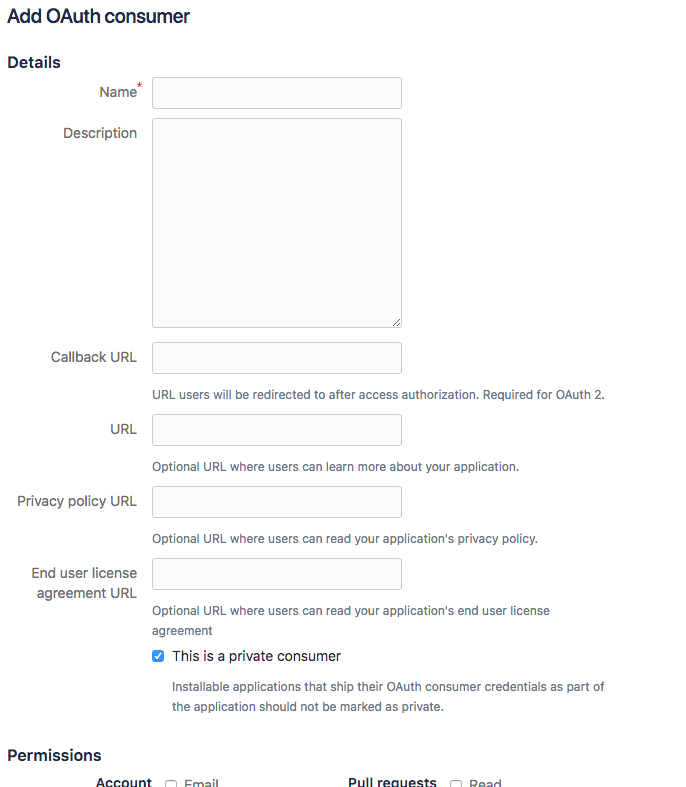
OAuth consumers 下的 Add consumer
callback URL 為 http://{drone-server ip}/authorize
這邊需要使用 Public IP(or domain),如果要在 local 端玩的話可以使用 ngrok
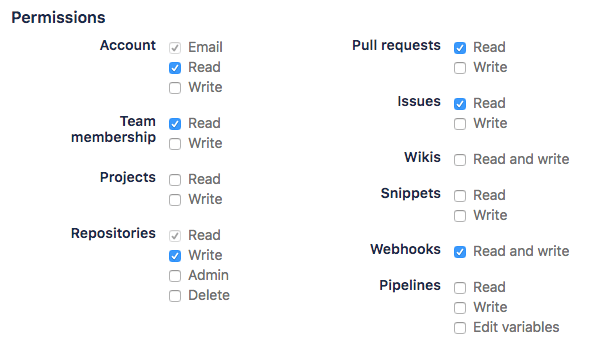
授權的權限至少需要
Account:Email
Account:Read
Team Membership:Read
Repositories:Read
Webhooks:Read and Write
Install & Startup
因為是基於 Docker 上的 CI/CD,所以得事先安裝 Docker,這邊就不多提了
然後直接尻官方的 docker-compose 就能動了(${} 的資訊是由 bitbucket 取得值)
version: '2'

services:
  drone-server:
    image: drone/drone:0.8

    ports:
      - 80:8000
      - 9000
    volumes:
      - /var/lib/drone:/var/lib/drone/
    restart: always
    environment:
      - DRONE_OPEN=true
      # drone-server IP,如果要在 local 端測試,可以使用 ngrok
      - DRONE_HOST=${DRONE_HOST}
      # Set to true to enable the Bitbucket driver.
+     - DRONE_BITBUCKET=true
      # Bitbucket oauth2 client id
+     - DRONE_BITBUCKET_CLIENT=${DRONE_BITBUCKET_CLIENT}
      # Bitbucket oauth2 client secret
+     - DRONE_BITBUCKET_SECRET=${DRONE_BITBUCKET_SECRET}
      # drone server 與 agent 溝通的 secret key
      - DRONE_SECRET=${DRONE_SECRET}

  drone-agent:
    image: drone/agent:0.8

    restart: always
    depends_on:
      - drone-server
    volumes:
      - /var/run/docker.sock:/var/run/docker.sock
    environment:
      # drone-server 位置
      - DRONE_SERVER=drone-server:9000
      # 跟上面的一樣
      - DRONE_SECRET=${DRONE_SECRET}
改上 ${} 的值後直接下
docker-compose up -d
然後 brower 連到 DRONE_HOST 就會看到該帳號可以使用的專案有哪些了(bitbucket 上的)
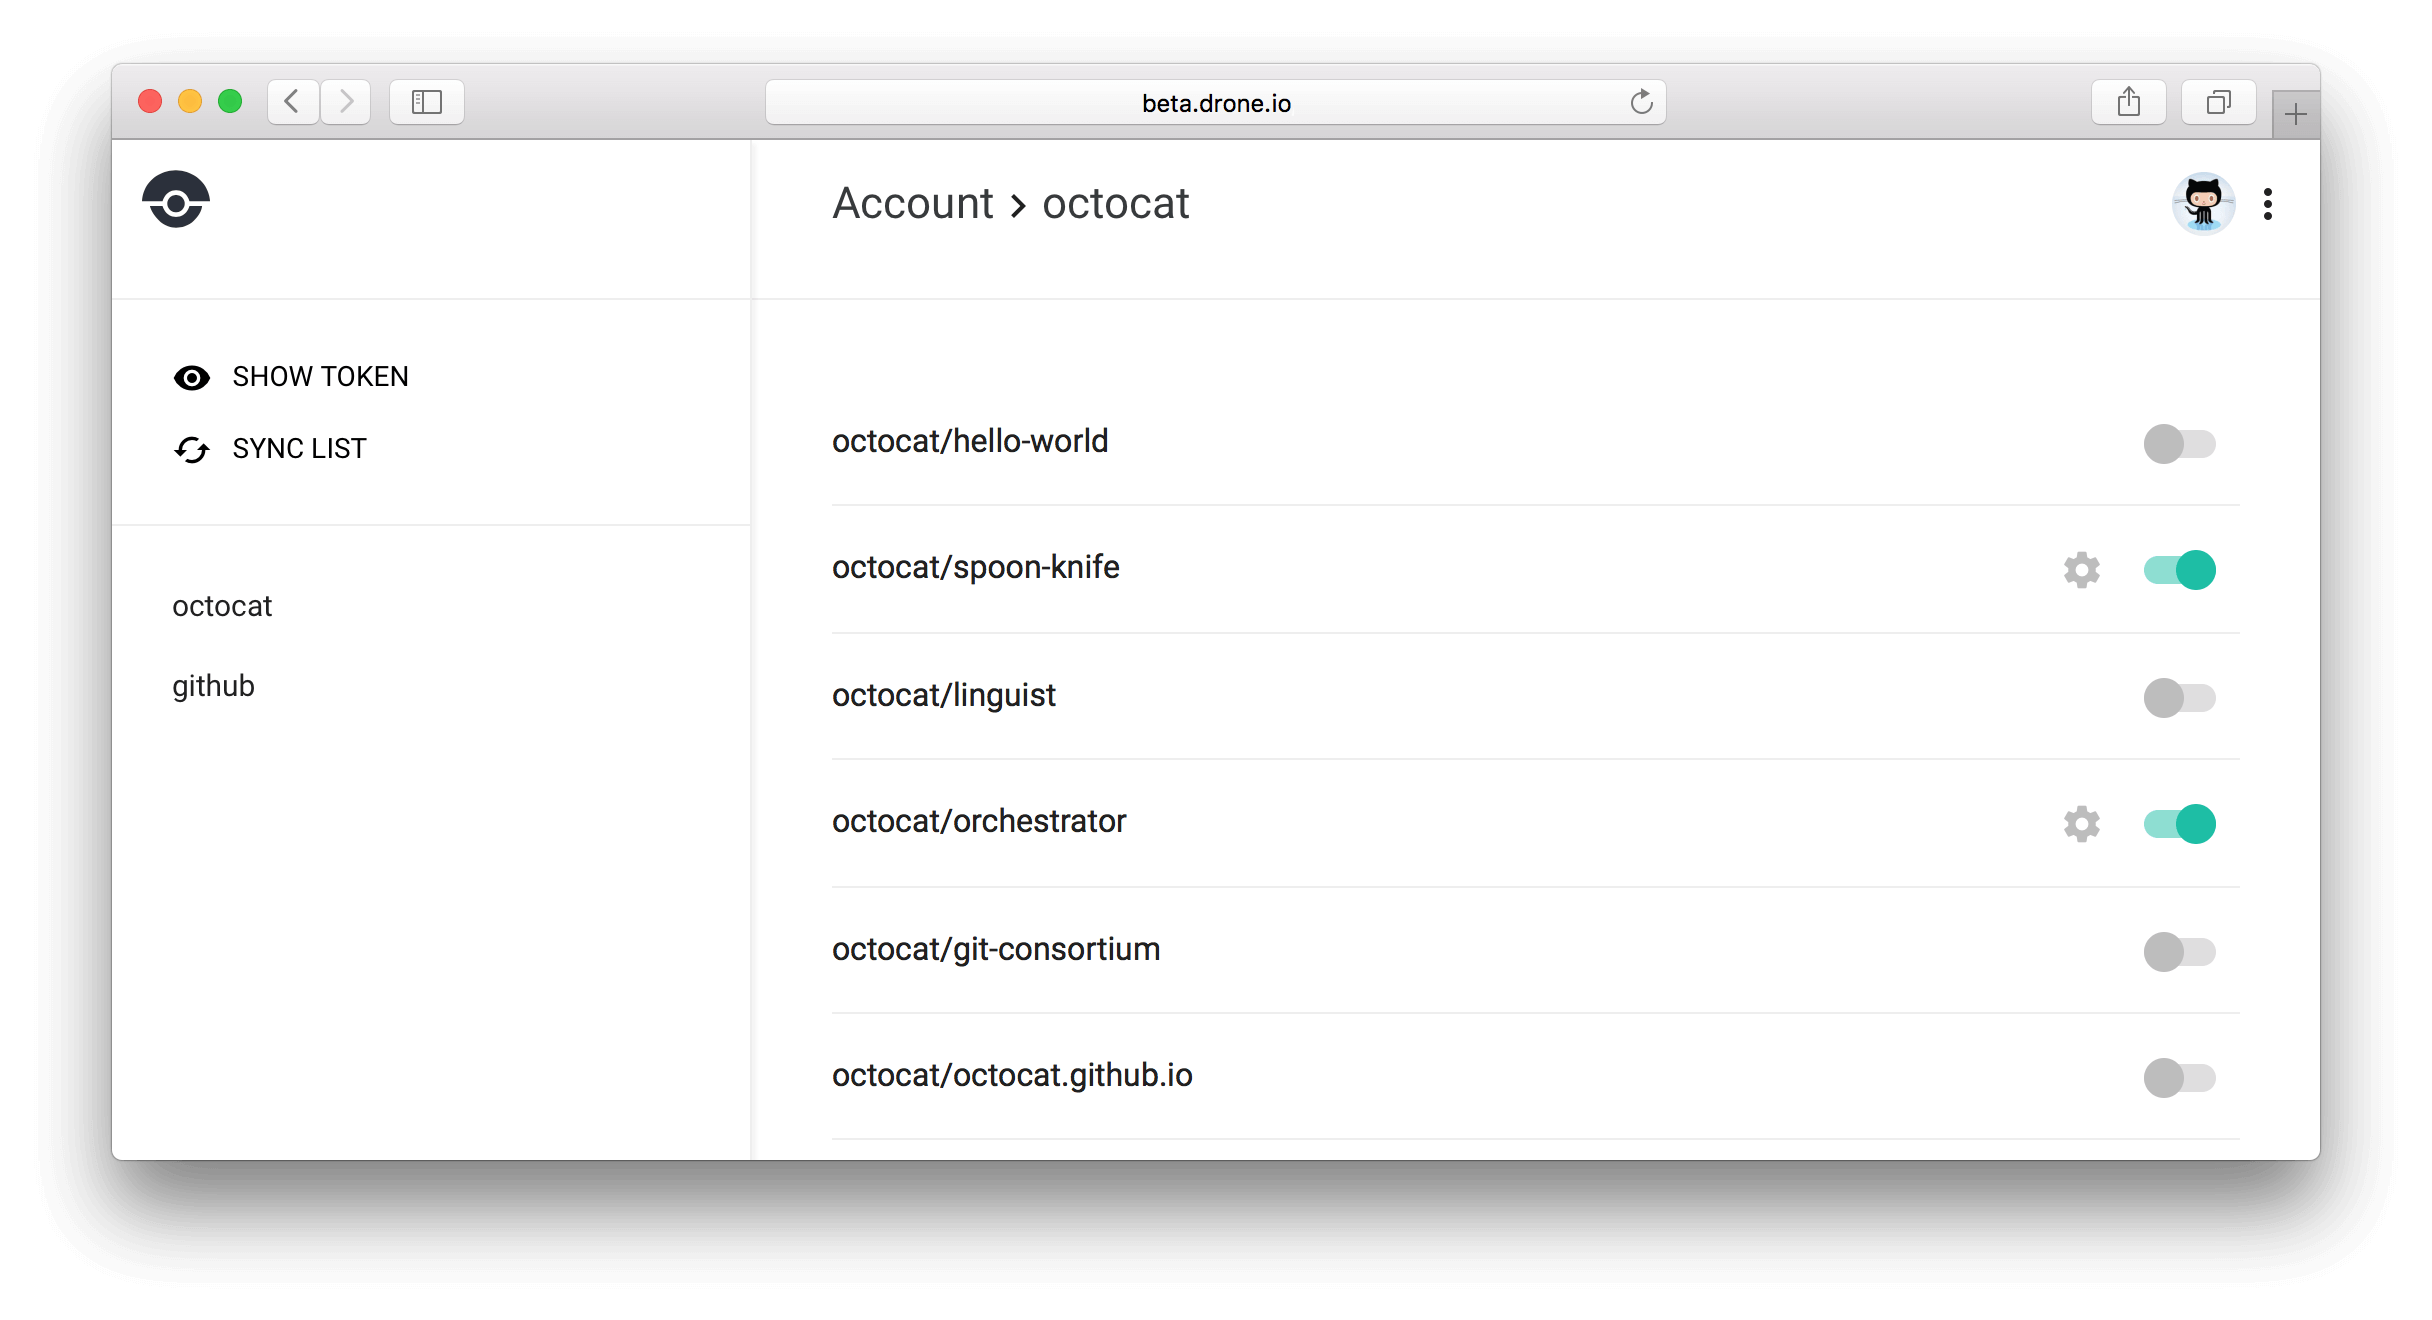
很直觀可以看到專案現在是否已啟動 CI/CD
第一次 CI 就上手
先在 dashboard 啟動專案(list 右方小圓點),然後在該專案中新增 pipeline,檔案名稱必須叫 .drone.yaml
# 官方範例
pipeline:
  build:
    image: golang
    commands:
      - go get
      - go build
      - go test

services:
  postgres:
    image: postgres:9.4.5
    environment:
      - POSTGRES_USER=myapp
這邊範例更簡單些(我比較懶,想先測試可不可行)
pipeline:
  test:
    image: golang
    commands:
      - go test
詳細的 pipeline 可以參考官方文件,這邊只是先簡單的跑
很簡單的看的出來,我開了一個 test 的 pipline 測試名稱,底下是跑一個 golang docker image,然後就是跑 go test 指令
是不是很簡單(X),寫起來很像在寫 docker-compose
在加完 .drone.yaml 寫一點程式跟 unit test 後 commit 並推上去,這時你就能看到 Drone 自動幫你測試程式了
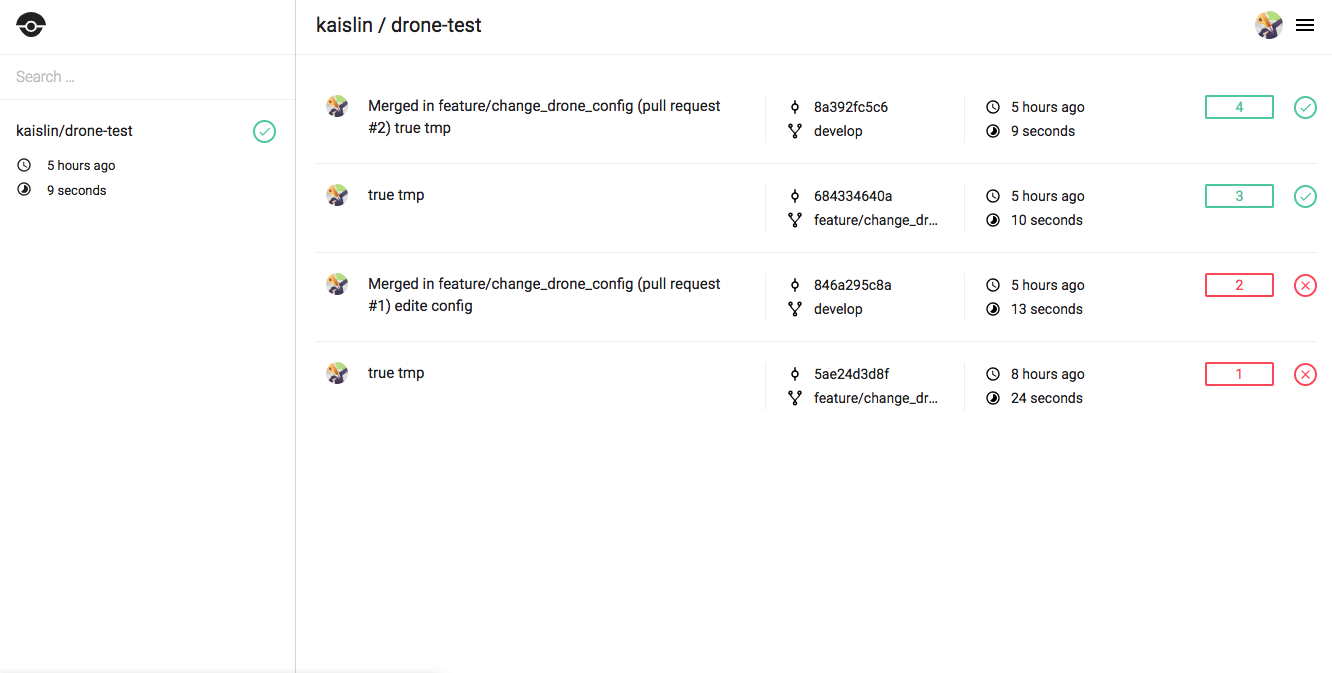
因為也在專案資料夾,所以會跟著進 git(版控),而且其他開發人員也可以透過它知道這個專案是如何被自動化測試的或是編譯跟佈署的
References
結語
學過 docker 應該能在非常短的時間內就完成上面的動作了,而且學起來沒什麼障礙(看我就知道)
未來有機會會在補相關的教學(沒偷懶的話)
然後突然發現 Post Directory 有 Bug(反正也沒人發現,下次想到再修吧(つд⊂))