Hello Smart Contract
25 Aug 2021Post Directory
Intro
最近面試區塊鏈公司,最常被問到的就是有沒有寫過 Smart Contract
所透過這次機會紀錄一下入門筆記
下面教學都來自 Alchemy Doc
這邊只做筆記跟補充的部份
詳細範例可以參考: https://github.com/VagrantPi/hello-smart-contract
🌎 建立合約
Source: 🌎 Hello World Smart Contract
按照教學就可以 step by step 部屬合約,目前看起來的步驟為
- compiler
- deploy
搭配文中提到的框架與相對應套件,可以簡單的完成部屬或與合約互動 (這邊使用 Node.js)
Step 0. 寫合約
// Specifies the version of Solidity, using semantic versioning.
// Learn more: https://solidity.readthedocs.io/en/v0.5.10/layout-of-source-files.html#pragma
pragma solidity ^0.7.3;

// Defines a contract named `HelloWorld`.
// A contract is a collection of functions and data (its state). Once deployed, a contract resides at a specific address on the Ethereum blockchain. Learn more: https://solidity.readthedocs.io/en/v0.5.10/structure-of-a-contract.html
contract HelloWorld {

   //Emitted when update function is called
   //Smart contract events are a way for your contract to communicate that something happened on the blockchain to your app front-end, which can be 'listening' for certain events and take action when they happen.
   event UpdatedMessages(string oldStr, string newStr);

   // Declares a state variable `message` of type `string`.
   // State variables are variables whose values are permanently stored in contract storage. The keyword `public` makes variables accessible from outside a contract and creates a function that other contracts or clients can call to access the value.
   string public message;

   // Similar to many class-based object-oriented languages, a constructor is a special function that is only executed upon contract creation.
   // Constructors are used to initialize the contract's data. Learn more:https://solidity.readthedocs.io/en/v0.5.10/contracts.html#constructors
   constructor(string memory initMessage) {

      // Accepts a string argument `initMessage` and sets the value into the contract's `message` storage variable).
      message = initMessage;
   }

   // A public function that accepts a string argument and updates the `message` storage variable.
   function update(string memory newMessage) public {
      string memory oldMsg = message;
      message = newMessage;
      emit UpdatedMessages(oldMsg, newMessage);
   }
}
這邊可以簡單看出來是一個存放 message 的合約,並在部屬時塞進 initMessage
Step 1, 2 compiler & deploy
使用下面兩種 DAPP DEVELOPMENT FRAMEWORKS 可以簡單的開發 Dapp
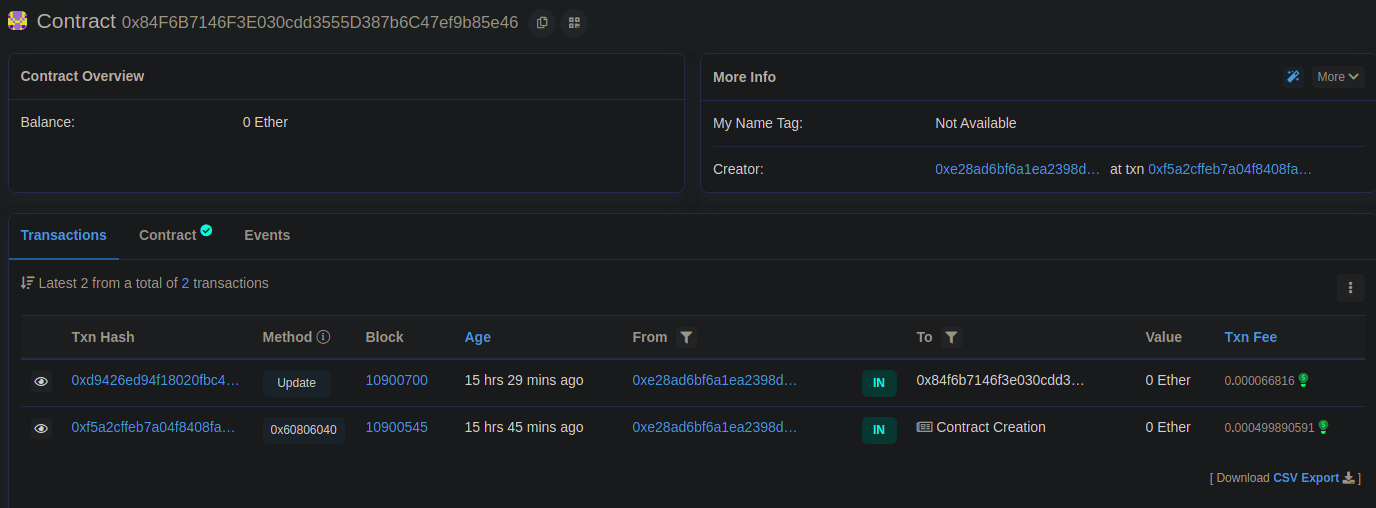
合約部屬後可以在 etherscan 上看到合約 EX:
https://ropsten.etherscan.io/address/0x84f6b7146f3e030cdd3555d387b6c47ef9b85e46
Hardhat
https://hardhat.org/getting-started/#overview
Ethereum 環境建制工具,用於編譯、部屬、debug,可以快速在環境測試部屬 smart contract 或 dApps
folders
.
├── artifacts     // build 完的檔案,包含 compiled contract (並非所有 .sol 檔案),還有完整 solc input and output 的 debug 資訊
├── cache
├── contracts     // 合約位置
├── node_modules
└── scripts       // 部屬腳本,合約互動的腳本存放位置
Ethers.js
配合套件 Ethers.js 可以簡單的操控 ETH-RPC 來實現合約部屬
npm install --save-dev @nomiclabs/hardhat-ethers "ethers@^5.0.0"
const HelloWorld = await ethers.getContractFactory("HelloWorld");

// Start deployment, returning a promise that resolves to a contract object
const hello_world = await HelloWorld.deploy("Hello World!");
console.log("Contract deployed to address:", hello_world.address);
Truffle
一樣是開發工具,但這邊部屬合約的方式是透過 migrate 的方式來管理一個不段迭代的跟新的合約
Migration file
腳本前綴會是執行的順序(ex: 4_example_migration.js)
// 與 Node's require 相似,使用合約定義的名字 require 近來使用
const HelloWorld = artifacts.require("HelloWorld");
const initMessage = "Hello world!";

// arguments 會有三個欄位 deployer, network, accounts:
// - deployer: 負責合約部屬的 Object(web3 provider instance )
// - network: 使用的網路名稱(string)
// - accounts: migration 時可用的錢包(unlocked)
module.exports = function(deployer) {
  deployer.deploy(HelloWorld, initMessage);
};
folders
.
├── build            // compiled contract
├── contracts        // 合約存放位置
├── migrations       // migration files(部屬腳本、合約互動)
├── node_modules
└── test
Truffle HDWallet provider
教學中使用 HDWallet 套件 Truffle HDWallet provider 建立錢包 Instance 來部屬合約
require('dotenv').config();
const HDWalletProvider = require("@truffle/hdwallet-provider");
const { API_URL, MNEMONIC } = process.env;

module.exports = {
  networks: {
    development: {
      host: "127.0.0.1",
      port: 7545,
      network_id: "*"
    },
    ropsten: {
      provider: function() {
        return new HDWalletProvider(MNEMONIC, API_URL)
      },
      network_id: 3,
      gas: 4000000 //4M is the max
    }
  }
};
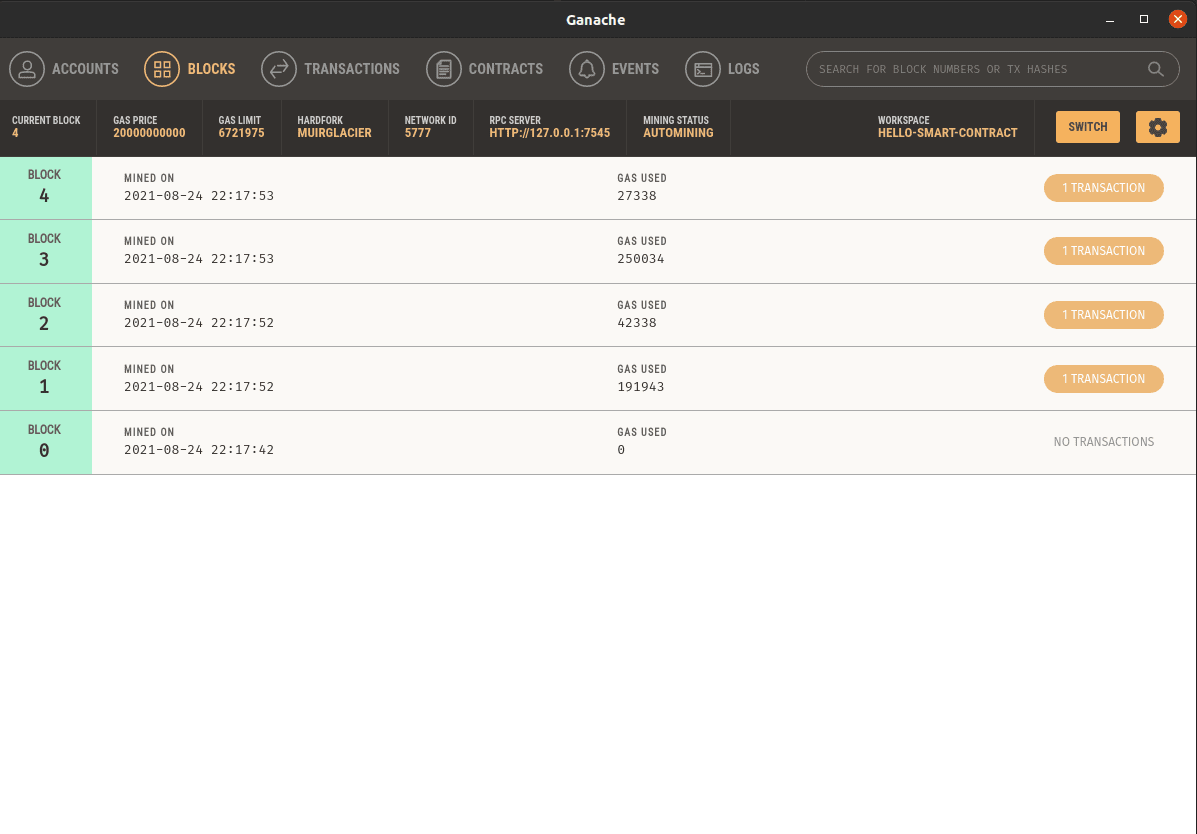
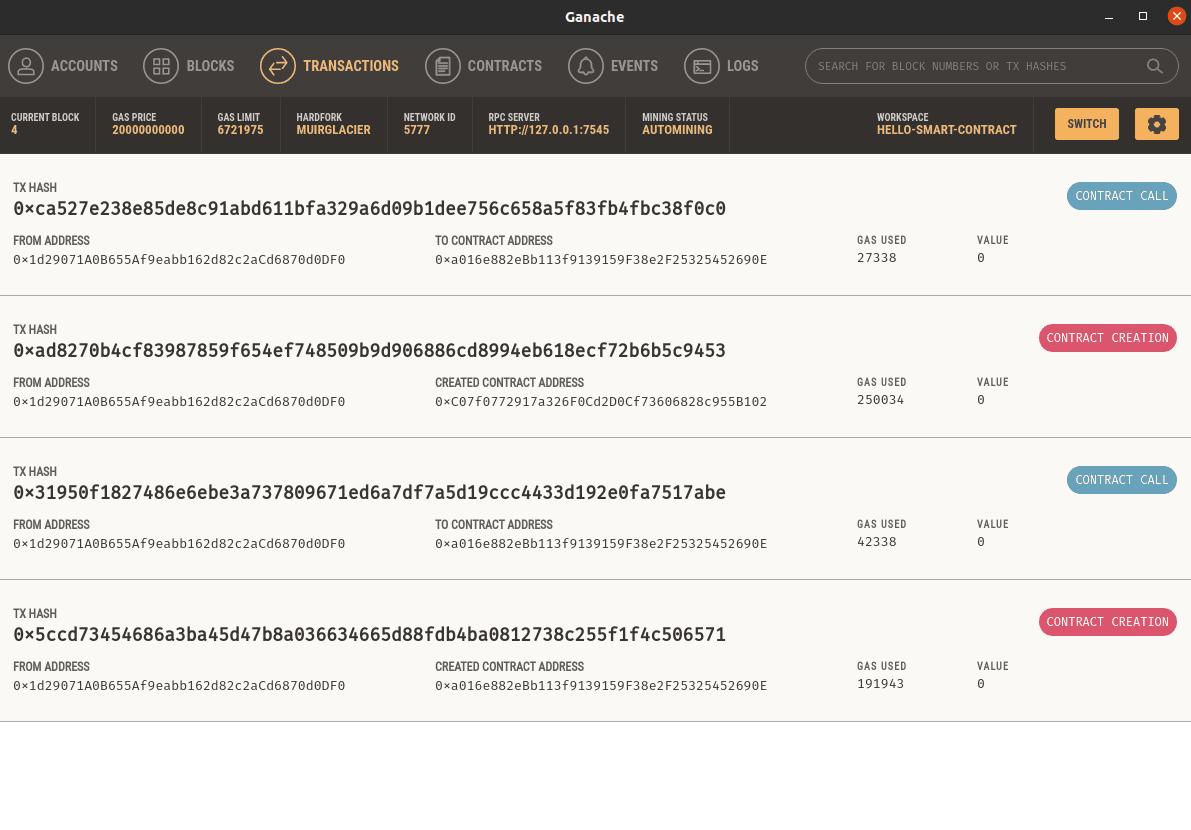
Ganache
間單的個人以太坊區塊鏈圖形化工具,可以建立自己的測試鏈,以方便直接在測試鏈上部屬測試
官網下載後直接點開就能用(開箱即用
然後在 truffle-config.js 指向 127.0.0.1 即可
networks: {
    development: {
      host: "127.0.0.1",
      port: 7545,
      network_id: "*"
    },
truffle migrate
💻 合約互動
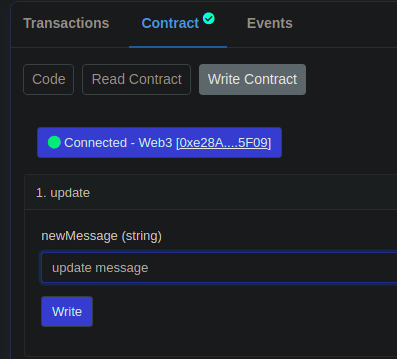
使用 Etherscan 簡單與合約互動
前面有提到部屬完可以在 etherscan 上看到,而且也可以直接在上面與合約互動
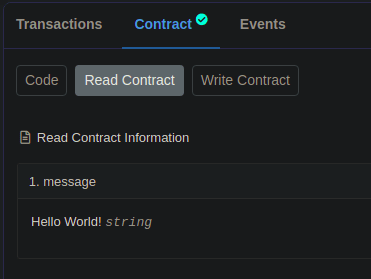
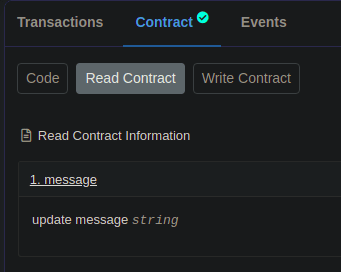
讀取合約變數
連接 web3 錢包
在 Write Contract 頁面點選 Connect to Web3
使用合約 Method
此時會看到有一筆操作合約 type: update 的交易
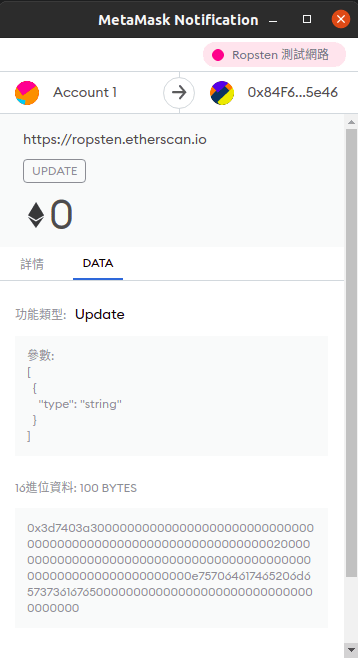
confirm 後就可以看到之前 initMessage 的變數被更新了
使用程式碼與合約互動
這邊使用 alchemy-web3 套件,提供自動重試功能,與 Websocket 支援
看 code 可以看到,將前面 Compiled 好的 ABI (Application Binary Interface) 拿來使用,使用另一個 Account 來對合約送一筆交易,並在 data 地方塞入呼叫合約的方法,這邊已經經過簡單的封裝了,可以簡單的呼叫 ABI
const { createAlchemyWeb3 } = require("@alch/alchemy-web3");
require('dotenv').config();

// For Truffle
const contract = require("../Hello World Smart Contract/truffle/build/contracts/HelloWorld.json");

const { API_URL, PUBLIC_KEY, PRIVATE_KEY } = process.env
const web3 = createAlchemyWeb3(API_URL);

const contractAddress = "0x051870a19066b55Dacebc72394006Ce7F16a81aa";
const helloWorldContract = new web3.eth.Contract(contract.abi, contractAddress);

async function updateMessage(newMessage) {
  const nonce = await web3.eth.getTransactionCount(PUBLIC_KEY, 'latest'); // get latest nonce
  const gasEstimate = await helloWorldContract.methods.update(newMessage).estimateGas(); // estimate gas

  // Create the transaction
  const tx = {
    'from': PUBLIC_KEY,
    'to': contractAddress,
    'nonce': nonce,
    'gas': gasEstimate,
    'maxFeePerGas': 1000000108,
    'data': helloWorldContract.methods.update(newMessage).encodeABI()
  };

  // Sign the transaction, and send rawTransaction
  const signPromise = web3.eth.accounts.signTransaction(tx, PRIVATE_KEY);
  signPromise.then((signedTx) => {
    web3.eth.sendSignedTransaction(signedTx.rawTransaction, function(err, hash) {
      if (!err) {
        console.log("The hash of your transaction is: ", hash, "\n Check Alchemy's Mempool to view the status of your transaction!");
      } else {
        console.log("Something went wrong when submitting your transaction:", err)
      }
    });
  }).catch((err) => {
    console.log("Promise failed:", err);
  });
}

async function main() {
  // 查看目前 message 變數
  const message = await helloWorldContract.methods.message().call();
  console.log("The message is: " + message);
  await updateMessage("Hello Drupe!");
}
main();
第一次會印出
The message is: Hello world!
然後隨著 updateMessage 完成,等待 confirm 後將該行註解掉在執行,就可以看到 message 已被更新
The message is: Hello Drupe!
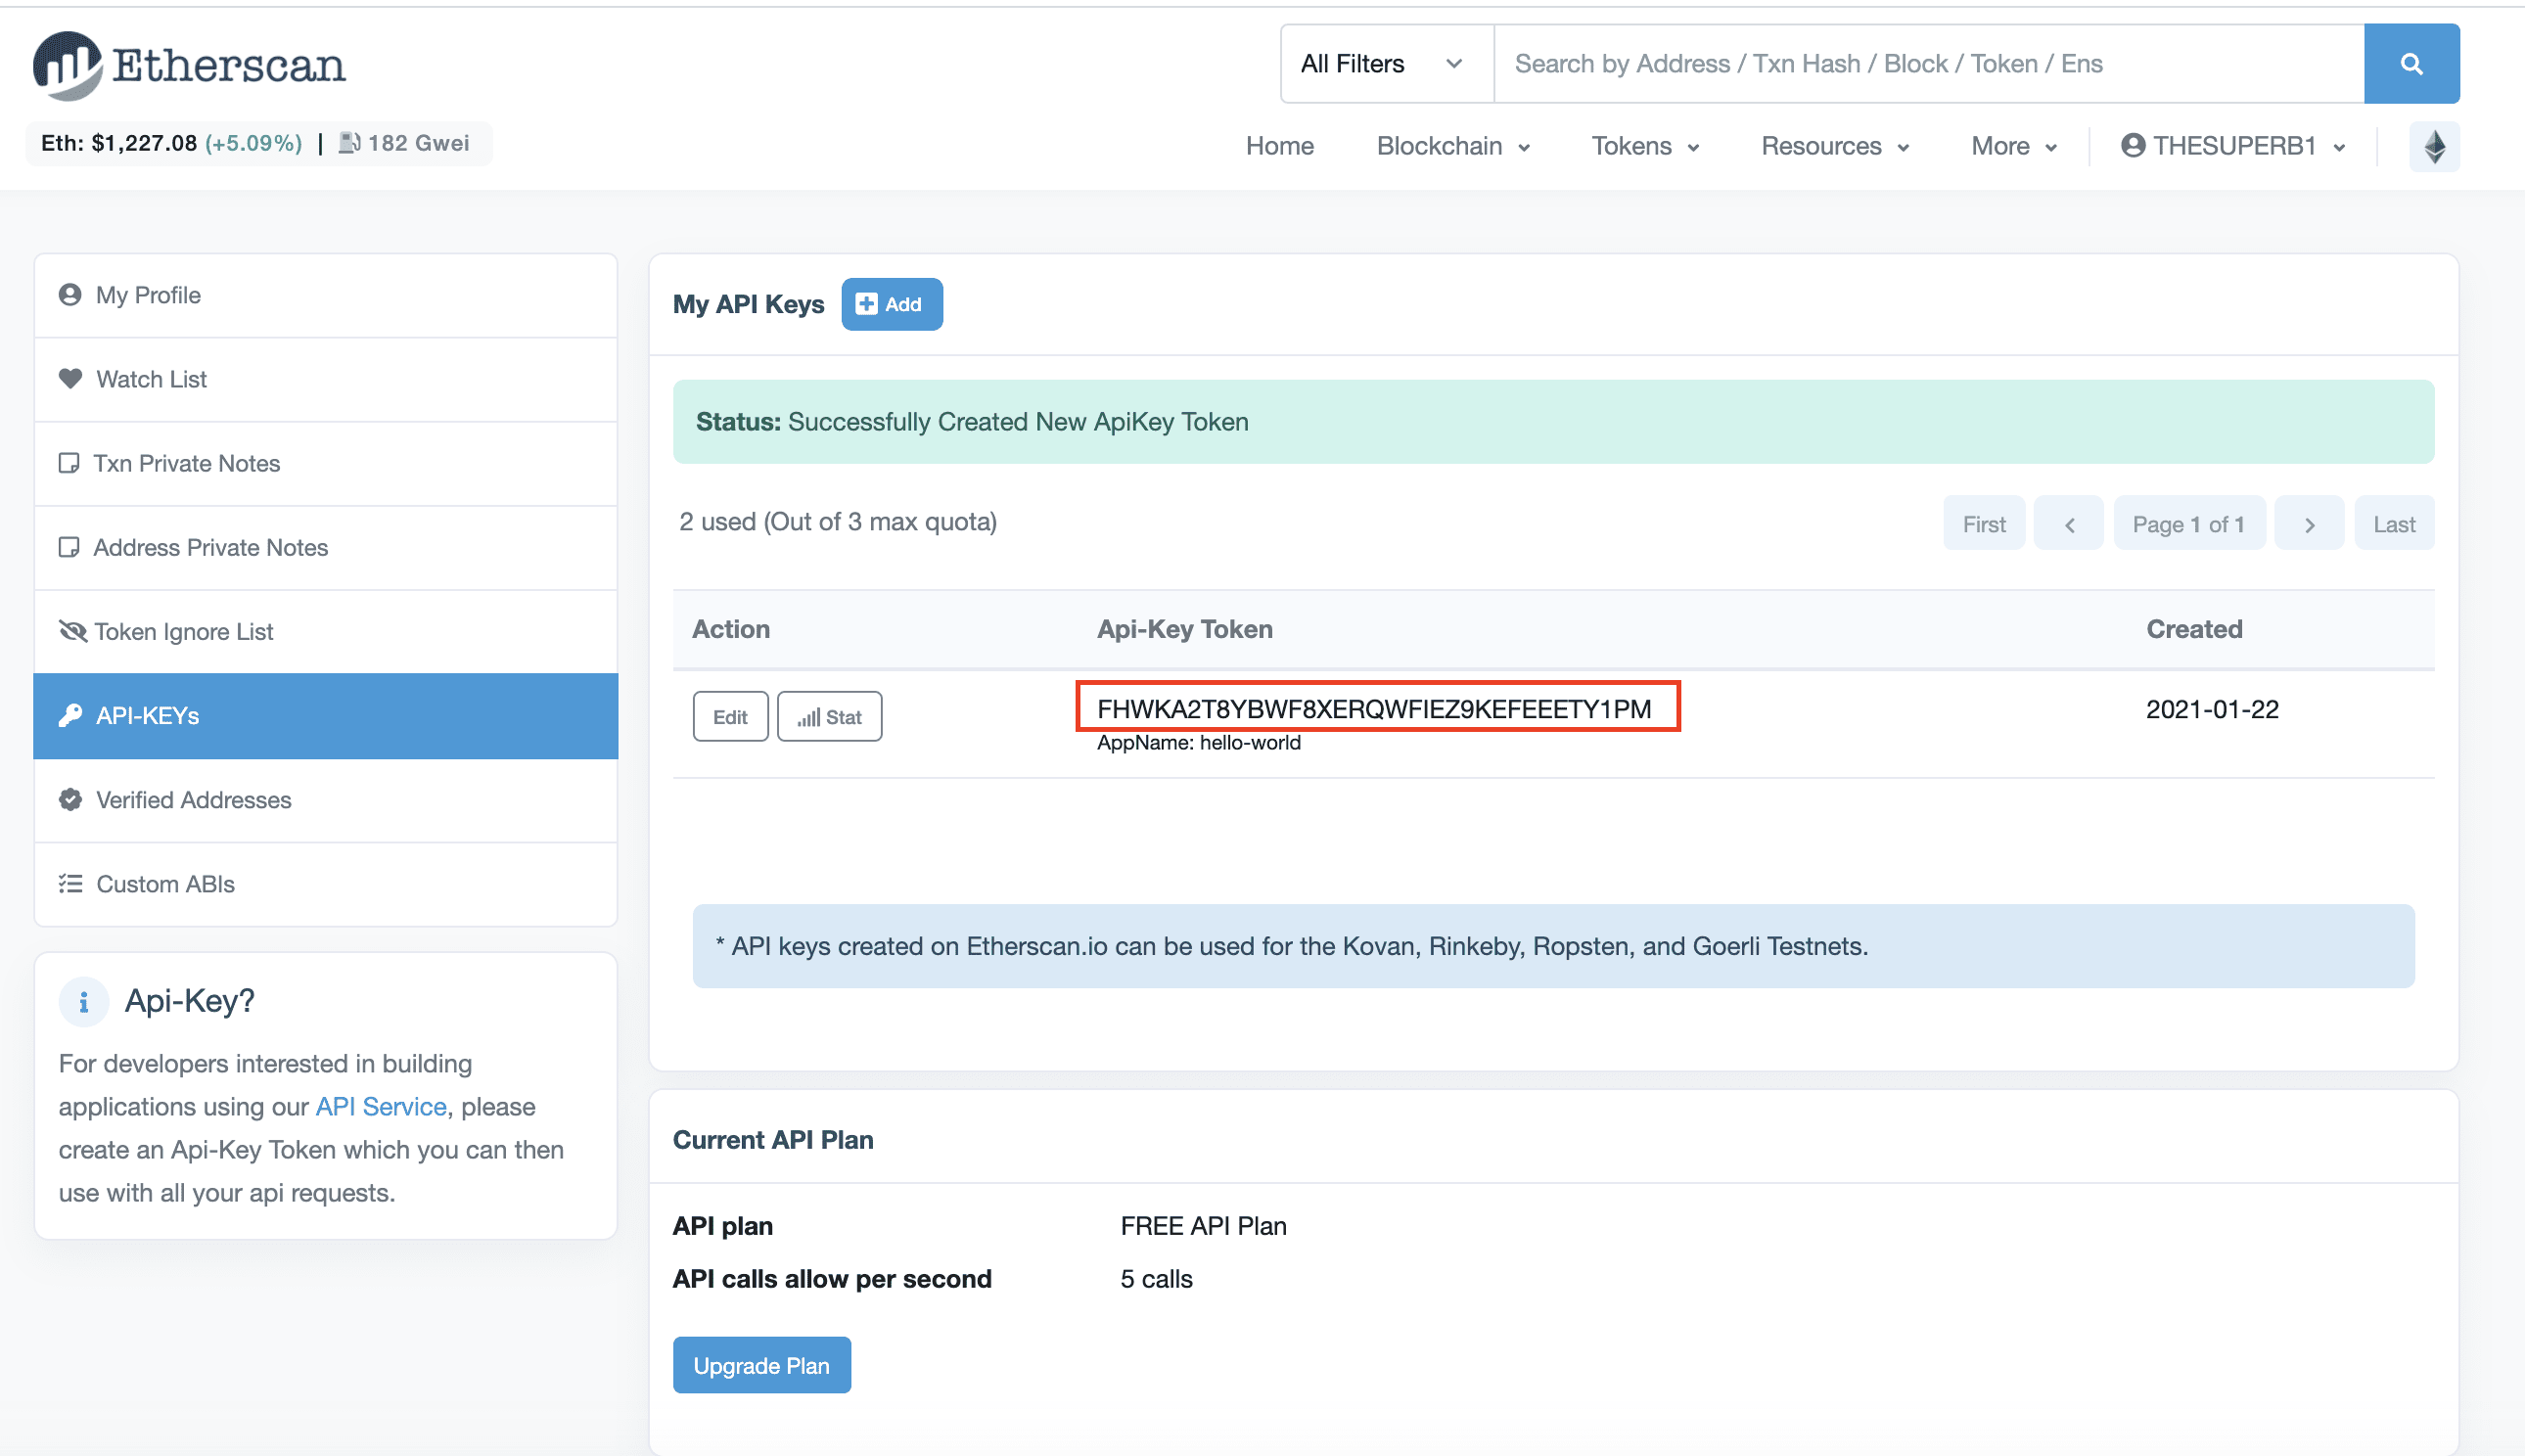
📩 在 Etherscan 上驗證智能合約
https://ropsten.etherscan.io/address/0x051870a19066b55Dacebc72394006Ce7F16a81aa#code
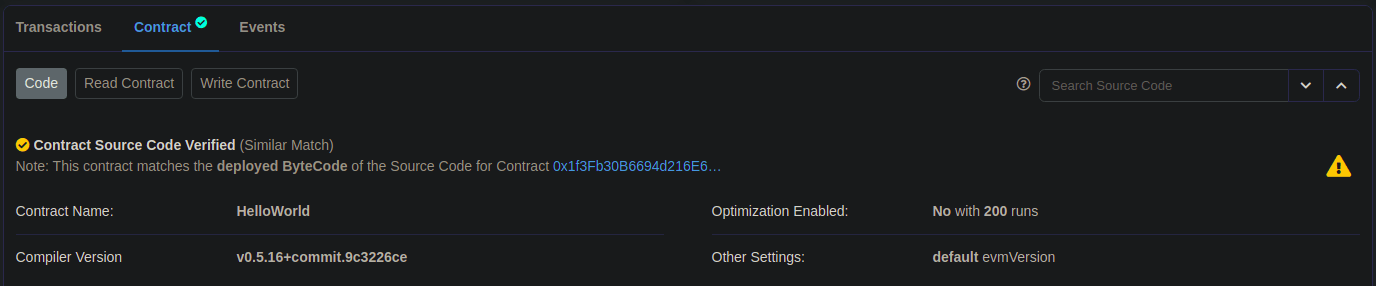

先在 Etherscan 取得 API Key
HardHat 使用hardhat-etherscan
npm install --save-dev @nomiclabs/hardhat-etherscan
Truffle 使用 truffle-plugin-verify
npm install -g truffle-plugin-verify
然後都在設定檔新增相對應的設定,然後在 .env 設定好 ETHERSCAN_API_KEY 後在執行指令就好
以 truffle 為例
truffle run verify HelloWorld --network ropsten
Verifying HelloWorld
Pass - Verified: https://ropsten.etherscan.io/address/<contract-address>#contracts
Successfully verified 1 contract(s).
詳細設定參考該篇教學即可
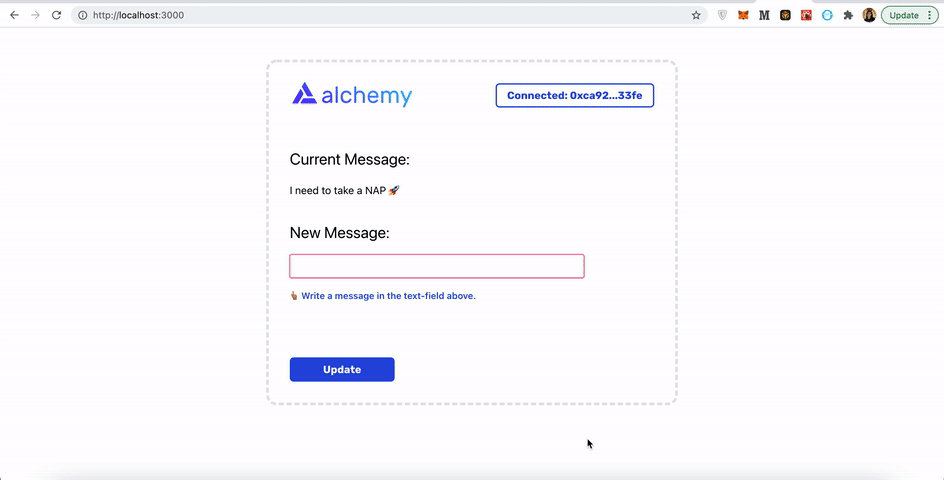
📱整合前端
文中使用到的範例
git clone https://github.com/alchemyplatform/hello-world-part-four-tutorial
使用合約 ABI
這邊使用到 @alch/alchemy-web3 來連接 ETH,然後改用 Websocket 接口,REACT_APP_ALCHEMY_KEY
require('dotenv').config();
const alchemyKey = process.env.REACT_APP_ALCHEMY_KEY;
const { createAlchemyWeb3 } = require("@alch/alchemy-web3");
const web3 = createAlchemyWeb3(alchemyKey);

//export const helloWorldContract;
然後將合約 ABI 下載下來,Contract ABI 那個欄位,下載成 contract-abi.json
接下來操作跟前面一樣的方法呼叫合約,並將相關邏輯都封裝在 interact.js,
require('dotenv').config();
const alchemyKey = process.env.REACT_APP_ALCHEMY_KEY;
const { createAlchemyWeb3 } = require("@alch/alchemy-web3");
const web3 = createAlchemyWeb3(alchemyKey);

const contractABI = require('../contract-abi.json')
const contractAddress = "0x6f3f635A9762B47954229Ea479b4541eAF402A6A";

export const helloWorldContract = new web3.eth.Contract(
  contractABI,
  contractAddress
);
合約事件監聽
當初合約有定義 Event UpdatedMessages
//Emitted when update function is called
//Smart contract events are a way for your contract to communicate that something happened on the blockchain to your app front-end, which can be 'listening' for certain events and take action when they happen.
event UpdatedMessages(string oldStr, string newStr);
在改接 ETH Websocket 的情況下
function addSmartContractListener() {
  helloWorldContract.events.UpdatedMessages({}, (error, data) => {
    if (error) {
      setStatus("😥 " + error.message);
    } else {
      setMessage(data.returnValues[1]);
      setNewMessage("");
      setStatus("🎉 Your message has been updated!");
    }
  });
}
可以寫一個 listener 監聽該事件,此時打一筆合約叫一的話就會出現在 UI 上
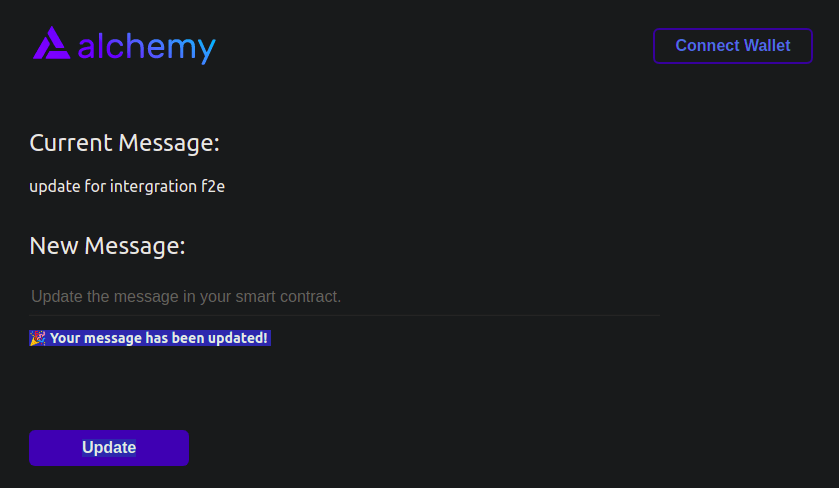
Connect Metamask to your UI
interact.js
export const connectWallet = async () => {
  if (window.ethereum) {
    try {
      const addressArray = await window.ethereum.request({
        method: "eth_requestAccounts",
      });
      const obj = {
        status: "👆🏽 Write a message in the text-field above.",
        address: addressArray[0],
      };
      return obj;
    } catch (err) {
      return {
        address: "",
        status: "😥 " + err.message,
      };
    }
  } else {
    return {
      address: "",
      status: (
        <span>
          <p>
            {" "}
            🦊{" "}
            <a target="_blank" href={`https://metamask.io/download.html`}>
              You must install Metamask, a virtual Ethereum wallet, in your
              browser.
            </a>
          </p>
        </span>
      ),
    };
  }
};
metamask 在全域有個 Ethereum Provider window.ethereum
根據文件的 API Access the user’s accounts (per EIP-1102) 範例連接錢包
HelloWorld.js
const connectWalletPressed = async () => {
  const walletResponse = await connectWallet();
  setStatus(walletResponse.status);
  setWallet(walletResponse.address);
};
新增 getCurrentWalletConnected function 在 initial 時先檢查是否連接過了
interact.js
export const getCurrentWalletConnected = async () => {
  if (window.ethereum) {
    try {
      const addressArray = await window.ethereum.request({
        method: "eth_accounts",
      });
      if (addressArray.length > 0) {
        return {
          address: addressArray[0],
          status: "👆🏽 Write a message in the text-field above.",
        };
      } else {
        return {
          address: "",
          status: "🦊 Connect to Metamask using the top right button.",
        };
      }
    } catch (err) {
      return {
        address: "",
        status: "😥 " + err.message,
      };
    }
  } else {
    return {
      address: "",
      status: (
        <span>
          <p>
            {" "}
            🦊{" "}
            <a target="_blank" href={`https://metamask.io/download.html`}>
              You must install Metamask, a virtual Ethereum wallet, in your
              browser.
            </a>
          </p>
        </span>
      ),
    };
  }
};
HelloWorld.js
useEffect(async () => {
  const message = await loadCurrentMessage();
  setMessage(message);
  addSmartContractListener();

  const {address, status} = await getCurrentWalletConnected();
  setWallet(address)
  setStatus(status);

}, []);
新增 addWalletListener 來 listener 錢包 Account 切換
HelloWorld.js
function addWalletListener() {
  if (window.ethereum) {
    window.ethereum.on("accountsChanged", (accounts) => {
      if (accounts.length > 0) {
        setWallet(accounts[0]);
        setStatus("👆🏽 Write a message in the text-field above.");
      } else {
        setWallet("");
        setStatus("🦊 Connect to Metamask using the top right button.");
      }
    });
  } else {
    setStatus(
      <p>
        {" "}
        🦊{" "}
        <a target="_blank" href={`https://metamask.io/download.html`}>
          You must install Metamask, a virtual Ethereum wallet, in your
          browser.
        </a>
      </p>
    );
  }
}
HelloWorld.js
useEffect(async () => {
  const message = await loadCurrentMessage();
  setMessage(message);
  addSmartContractListener();

  const {address, status} = await getCurrentWalletConnected();
  setWallet(address)
  setStatus(status);

  addWalletListener();
}, []);
最後串接合約 updateMessage
錢包連線搞定後剩下呼叫合約的 updateMessage 需要實做,流程為:
- 確定要發布的 message 為合法的值
- 使用 Metamask 對合約超操作的交易簽名
Step 1. validate message
interact.js
export const updateMessage = async (address, message) => {
  if (!window.ethereum || address === null) {
    return {
      status:
        "💡 Connect your Metamask wallet to update the message on the blockchain.",
    };
  }

  if (message.trim() === "") {
    return {
      status: "❌ Your message cannot be an empty string.",
    };
  }
  ....
Step 2. Signing our transaction
interact.js
...
  //set up transaction parameters
 const transactionParameters = {
    to: contractAddress, // Required except during contract publications.
    from: address, // must match user's active address.
    data: helloWorldContract.methods.update(message).encodeABI(),
  };

  //sign the transaction
  try {
    const txHash = await window.ethereum.request({
      method: "eth_sendTransaction",
      params: [transactionParameters],
    });
    return {
      status: (
        <span>
          ✅{" "}
          <a target="_blank" href={`https://ropsten.etherscan.io/tx/${txHash}`}>
            View the status of your transaction on Etherscan!
          </a>
          <br />
          ℹ️ Once the transaction is verified by the network, the message will
          be updated automatically.
        </span>
      ),
    };
  } catch (error) {
    return {
      status: "😥 " + error.message,
    };
  }

};
HelloWorld.js
const onUpdatePressed = async () => {
  const { status } = await updateMessage(walletAddress, newMessage);
  setStatus(status);
};